Free 3D file Longer Nintendo Switch Jig for 1mm Paperclip 📎・3D printer design to download・Cults
Por un escritor de hombre misterioso

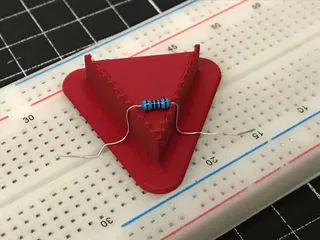
## Usage 1. Print 1. Put unfolded paperclip / wire in (solder works great too!) 1. Put Switch into RCM by sliding on right side and holding VOL+ and pressing Power ## Debugging This might not be the greatest design of these as this is only v6 I printed and tested, but it does work. The paperclip I used wasn't cut down, but I did use a lighter to burn off any coating (if there was any, idk). The final paperclip had a resistance of 300-1000 Ohm, total length of ~8cm. ## Design decisions 1. Asymmetric: worked best in tests. 1. Longer: my own preference for jigs, to not lose them. Also makes using actual paperclips easier as you don't have to cut them short. 1. Thicker wire: up to 1.2mm wire should work, all my paperclips were 1mm+ so I needed a larger design 1. Simple top: there's a lot of space for designs on the top, but let's appreciate the clean look.
RCM Jig and wire bending template for Nintendo Switch by Sulya, Download free STL model

Free STL file Nintendo Switch Lite Stand 🕹️・3D printer design to download・ Cults

paperclip rcm jig 3D Models to Print - yeggi - page 7

▷ 3d print nintendo switch jig 【 STLFinder 】

Free STL file Nintendo Switch Docking Case 🎵・3D print design to download・ Cults
▷ switch rcm jig paper clip 3d models 【 STLFinder 】

Thingiverse - Digital Designs for Physical Objects
RCM Jig and wire bending template for Nintendo Switch by Sulya, Download free STL model
▷ switch rcm jig paper clip 3d models 【 STLFinder 】

fail0verflow's RCM jig - 3D printing files : r/SwitchHacks
Switch 3d Printed

3D-Printed Electric Slide Switch (Using Only a Paperclip) : 7 Steps (with Pictures) - Instructables

MM3D Catalog 10 – 3DPrintFarming